This week we’re pleased to have a knowledgeable and experienced guest blogger, Mr. Don Becker. Don opened his business, Don Becker Photography, in 1976, specializing in commercial photography and personal fine art photography. He photographed the Washington Ballet for over fifteen years, and he is also a published author on photography and photographic techniques. Don joined the staff of WSP in 1983, and has been with us ever since; he now serves as the school’s Technical Director. For more information about Don and his work, please visit his website, www.donbeckerphoto.com.
Here’s some useful information from Don on Color Temperature & White Balance. This is the first of a two-part article.
Understanding Color Temperature & White Balance
Part 1
by Don Becker
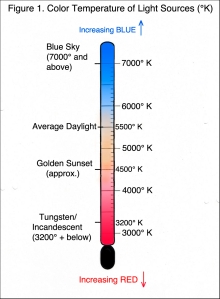
In color photography, the hues and tones of the captured image are significantly influenced by the color of the incident light. This incident light can be described by its “color temperature”, which represents a composite of the wavelengths of visible radiation of which it is composed. For photographic purposes, the most important sources of light commonly used and their color temperatures are shown in Figure 1.
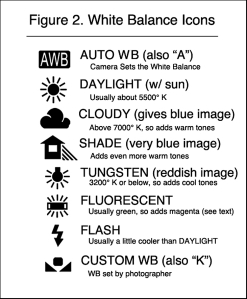
The white balance settings on your camera will cover most of the types of lighting commonly experienced. These settings are usually indicated by symbols or icons. A representative set of such icons used by Nikon cameras are shown in Figure 2, along with the white balances they represent.
Other camera icons will often be the same or very similar, with some alternative symbols mentioned in the figure. Many cameras also have additional white balance controls, which allow the photographer to set specific color temperatures in degrees Kelvin (see footnote for additional information on the Kelvin temperature scale). For example, if you wanted to use that capability, you could set your camera at the specific color temperature of 5500°K rather than at “Daylight”, and you should obtain approximately the same result. The advantage of using this control is that if you would like your images to be just a little bit warmer or cooler, you can set your white balance to, say 200°K higher or lower than the icon setting. As indicated in Figure 1, a higher temperature shifts the color towards the blue (“cooler”) tones, while a lower color temperature shifts the color towards the red (“warmer”) tones.
However, keep in mind that the camera control should be set at what the light is, in order to obtain neutral or non-tinted images. So therefore, if I were to photograph something at night in the living room of my home with no supplementary light, just the incandescent light in household lamps, I would generally start out with an Incandescent light icon setting. This corrects for approximately 3200°K, which is the color temperature of photofloods and quartz/halogen photographic lighting. Probably the image would still be too “warm” (orange colored), because the color temperature of a 100-watt incandescent light is about 2850°K. So, if I use the color temperature control on the camera and set the color balance setting to 2800°K, I should be OK. To test that, shoot a white piece of paper and see if it now looks white, rather than yellow or orange. If you are using 60-watt or 75-watt incandescent lights you will likely need to go down to perhaps 2500°K in your setting, because lower-wattage incandescent lights are more red in color output. You should set the color temperature in the camera to what the lighting temperature is, for a first approximation, then modify the color temperature setting until it looks right. Of course, you can also look in your camera manual for the method to set your custom white balance for any color lighting situation. Mixed lighting (e.g., both incandescent lighting plus outdoor windowlight) will usually require a compromise, making you choose which lighting to correct for. Often setting the camera to daylight (or perhaps a little bluer) for the window lighting, and letting the incandescent light be somewhat orange, would be the preferred compromise.
Different brands of cameras may have slightly different color balance settings for each icon, and different people may have different preferences for their images. For example, with my Nikon D3 camera when using Norman studio flash units, I prefer to set my white balance to the Daylight icon rather than the Flash icon because I like the slightly warmer image quality I get from that setting. Generally flash units tend to be a little cooler than sunlight.
Tune in next week for the conclusion of this article, which deals with the lovely green glow of a fluorescent light!


